
TL;DR
Acoustic dampening reduces echo inside a space, but true soundproofing blocks sound from escaping. Moving your rig to another room is the most effective fix, while a closet can work for noise control if ventilated properly. Placement of panels and sealing gaps are key for quality sound control.
Imagine a noisy GPU rig rattling away in your closet while you work peacefully at your desk. That’s the power of smart placement combined with simple acoustic tricks. Most people think soundproofing means filling every inch with foam, but the truth is, the real game-changers are where you put your gear and how you treat the space around it.
Today, we’ll explore how to make your closet work as a quiet, focused zone—whether for recording vocals, running AI models, or just keeping noise out of your home. You’ll learn what’s actually effective, where to place panels, and how to keep your rig cool while muffling the noise.
Acoustic dampening
& the rig in the closet.
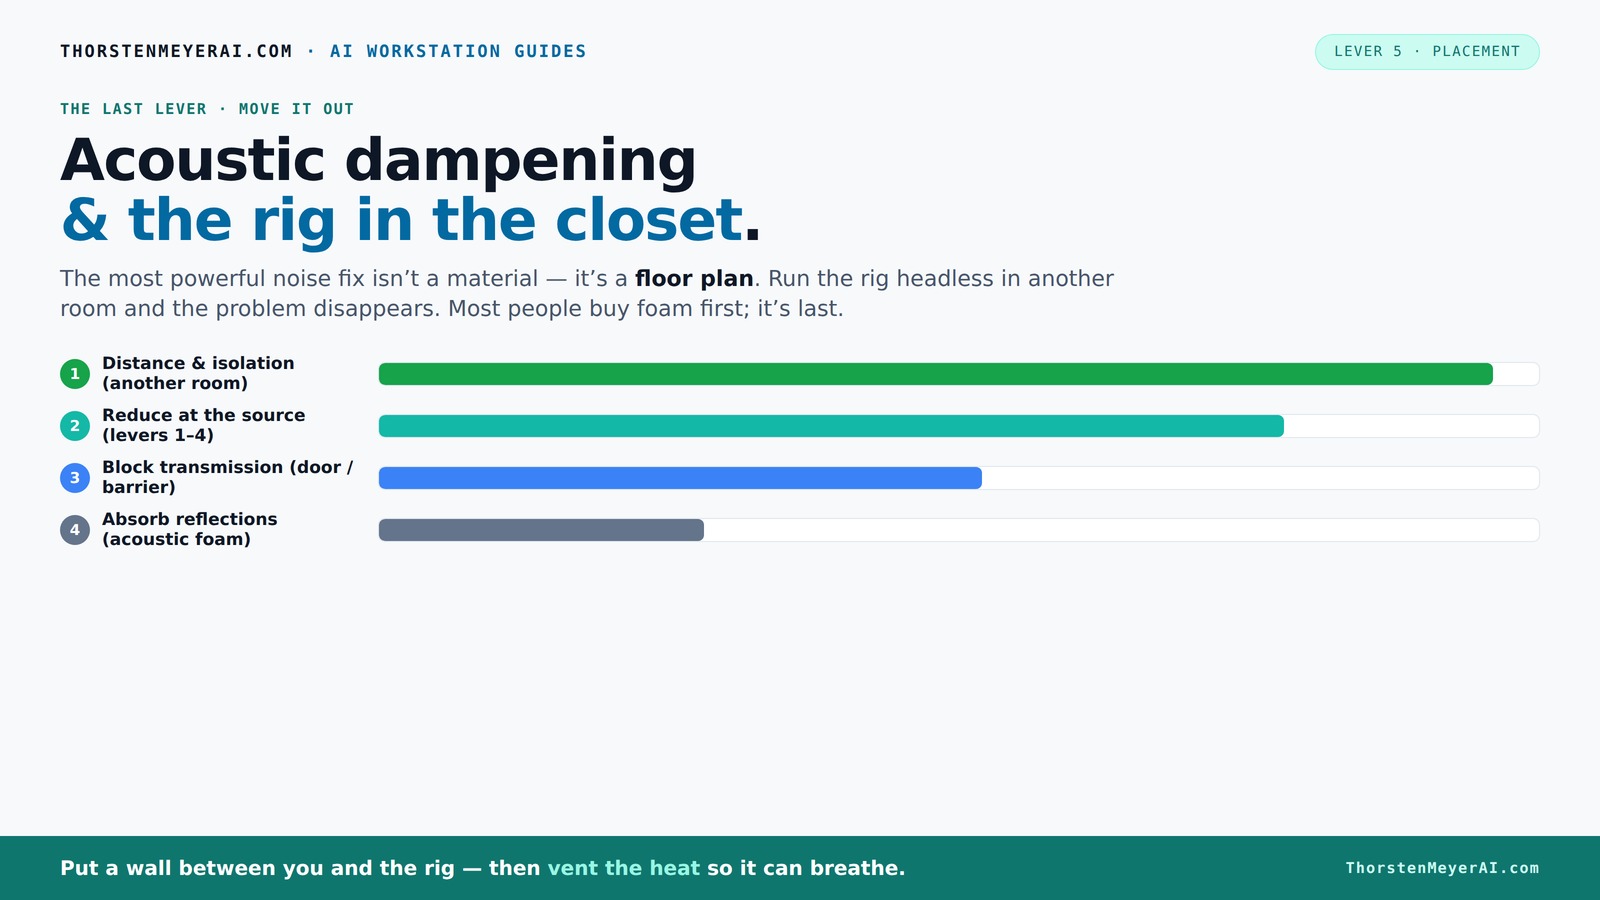
The most powerful noise fix isn’t a material — it’s a floor plan. A rig you can’t hear because it’s in another room beats any amount of foam. Tap the approaches in Part 1 to see what actually works.
(another room)
(levers 1–4)
(door / barrier)
(acoustic foam)
Contain the noise, not the heat
Key Takeaways
- Distance and physical barriers are the most effective ways to reduce noise—move your rig away or into a closet, not just add foam.
- Proper placement of acoustic panels at reflection points drastically improves sound clarity, especially behind the mic and ceiling.
- Sealing gaps around doors and vents is a simple, high-impact fix for sound leaks, often more effective than foam alone. Find out more about sealing and acoustic sealing techniques.
- Ventilation is critical in closet setups; passive vents or exhaust fans prevent heat buildup and equipment damage.
- Budget tricks like blankets, rugs, and clothing can significantly improve sound quality without expensive gear.

Focusound 52 Pack Acoustic Foam Panels 1" x 12" x 12" Sound Proof Foam Panles Soundproofing Noise Cancelling Wedge Panels for Home Office Recoding Studio with 300PCS Double-Side Adhesive
Soundproofing - Acoustic foam panels triangular grooves structure for better noise absorption, helps to reduce and absorb unwanted...
As an affiliate, we earn on qualifying purchases.
As an affiliate, we earn on qualifying purchases.
Why Acoustic Dampening Isn’t the Same as Soundproofing
Acoustic dampening and soundproofing are two different beasts. Dampening is about reducing echo and reverb inside a room—think of it like softening a giant echo chamber. Soundproofing, on the other hand, blocks sound from leaking out or coming in.
For example, a foam panel on your wall will make your voice sound less boomy and echoey but won’t stop your neighbor from hearing your loud PC. Conversely, sealing gaps around your door and using heavy barriers can keep sound from escaping, even if your room still echoes inside.
Understanding this difference helps you choose the right tools for your goals. Want quiet for your home office? Seal gaps and add soundproof barriers. Need a cozy vocal booth? Focus on absorption and reflection control.
It’s important to recognize that dampening alone won’t make your space soundproof. You might reduce echo significantly, but noise leaks will still be audible outside the room. Conversely, trying to soundproof by sealing everything can trap heat and humidity, creating an uncomfortable environment. Therefore, balancing both approaches based on your needs will give you the best results—dampening for clarity and control, soundproofing for isolation.
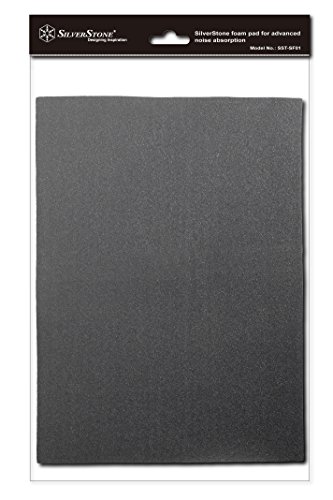
Silverstone 21-Inch x 15-Inch 4mm Thick 2-Piece Sound Dampening Acoustic EP0M Silent Foam SF01 (Black)
Great quality EPOM foam material for noise absorption
As an affiliate, we earn on qualifying purchases.
As an affiliate, we earn on qualifying purchases.
Where to Place Acoustic Panels for Maximum Effect
Placement of acoustic treatment is everything. The first step is identifying the reflection points—these are the surfaces where sound bounces back toward your mic or ears. For more on this, see acoustic treatment placement. For a closet setup, start with the wall behind your microphone and the ceiling.
For example, hanging a panel directly behind your mic reduces the worst reflections that cause echo and harshness. Next, treat the side walls—especially if they are parallel, which can cause standing waves and bass buildup.
In a small closet, densely covering these points can drastically improve clarity. Think of it as putting cushions in the right spots to soften the sound bouncing around.
According to experts, treating these reflection points yields the most noticeable difference in sound quality, even with budget materials like moving blankets or foam panels. However, it’s not just about throwing panels up randomly. Strategic placement ensures that sound energy is absorbed at the most critical points, preventing it from bouncing around and creating muddiness or harshness.
Furthermore, the placement should consider the specific frequencies you want to control. Low-frequency issues often require bass traps placed in corners, while mid and high frequencies benefit from panels at reflection points. This targeted approach optimizes your limited space for maximum clarity and reduces the need for excessive treatment.
ventilated closet soundproof enclosure
As an affiliate, we earn on qualifying purchases.
As an affiliate, we earn on qualifying purchases.
How to Use Your Closet as a Vocal Booth Without Turning It Into a Sauna
Using a closet as a vocal booth is totally doable—if you handle the heat right. The biggest mistake is sealing the space completely, trapping heat and cooking your gear. For tips on proper setup, check out closet vocal booth tips. Instead, treat it like a mini ventilation system.
Here's the step-by-step:
- Install passive vents or small exhaust fans to let heat escape. This maintains airflow and prevents heat buildup that can damage equipment or cause discomfort.
- Use weatherstripping or acoustic sealant on gaps around the door. This reduces noise leaks while allowing some airflow.
- Add thick blankets or acoustic curtains over door openings for extra noise reduction. These can be easily moved or adjusted as needed.
- Place bass traps in the corners if low-end sounds boomy, which is common in small, enclosed spaces.
This way, your closet stays cool, and your recordings sound tight and dry. A well-ventilated closet can be as quiet as a dedicated vocal booth without the cost or effort of full construction. Learn more about ventilation and acoustic treatment.
Keep in mind that the balance between soundproofing and ventilation is crucial. Over-sealing can trap heat and humidity, damaging equipment and degrading sound quality. Conversely, too much ventilation can let noise escape. Finding the right compromise—such as installing small vents combined with absorptive materials—will ensure comfort and acoustic quality. For more detailed guidance, check out this article on reducing heat and noise.
20 PCS Case Fan Mount Screws, Black Silicone Mounting Pin Rivet Reducing Noise Vibration Screws Fan Rivet for PC Chassis Cooling Fans (9mm X 22.7mm)
Package Contents: You will receive 20 black chassis fan noise-reducing and shock-absorbing soft rubber screws. This ample quantity...
As an affiliate, we earn on qualifying purchases.
As an affiliate, we earn on qualifying purchases.
The Best Placement for Your Microphone in a Tiny Space
Your mic placement in a small closet matters more than you think. Position the mic about 6-8 inches from your mouth, pointing slightly downward or at an angle to avoid capturing too much of the reflective surfaces. For more on mic placement, see microphone positioning tips.
For example, if you’re recording vocals, place a foam panel behind the mic to absorb rear reflections while keeping the mic away from the walls to prevent sound bouncing back.
Remember, the goal is to minimize reflections that cause harshness or echo. Using a portable mic stand that can be moved around helps you find the sweet spot where your voice sounds most natural and dry.
Combine this with treating the reflection points around the mic, and your recordings will sound professional even in a tiny space.
Additionally, experimenting with mic angles and distances can reveal the optimal position to capture your sound accurately. Small adjustments can significantly reduce unwanted reflections and room tone, leading to clearer, more professional recordings.
Sealing Gaps and Doors: Quieting Your Closet’s Leakiest Spot
The biggest sound leaks often happen through gaps around the door, seams, or vents. Sealing these is simple and surprisingly effective. Use weatherstripping around the door frame and add a thick blanket or acoustic panel over the door for extra noise blocking.
For example, a DIY musician in a small apartment sealed gaps with foam weatherstrips and hung a moving blanket over the door. This reduced noise leakage by over 70%, making it much easier to record without disturbing neighbors.
But why does sealing gaps make such a difference? Because sound finds the easiest path to escape—cracks, seams, and vents. When these are blocked, the sound energy is contained within the room, preventing it from leaking out and reducing external noise intrusion. This simple step can dramatically improve your room’s isolation, especially when combined with other treatments like absorption and bass trapping. Remember, even small gaps can let significant amounts of sound escape, so thorough sealing is key to creating a more controlled environment.
More tips can be found in this guide on sealing a closet.
Budget-Friendly Tricks for Better Sound in a Small Space
You don’t need expensive gear to make a closet sound better. Use soft furnishings like blankets, rugs, and clothes to absorb high frequencies and reduce echo. Hang thick curtains or moving blankets on the walls, especially at reflection points.
For example, a YouTuber turned her closet into a vocal booth with a few budget buys: a couple of foam panels, a thick blanket, and a small fan for ventilation. The result? Clearer vocals and much less echo.
Remember, the key is to target the most reflective surfaces first—cover the walls, ceiling, and door gaps—and then add low-cost traps or furniture to absorb bass and reduce low-end boom. Rearranging furniture or adding soft items like clothing or rugs can also help break up sound reflections, making your space sound more balanced without expensive treatments.
This approach is flexible, reversible, and perfect for DIYers.
Common Mistakes to Avoid When Making a Closet Studio
Many DIYers overdo the foam or forget about sealing gaps. The worst mistake? Relying solely on thin foam panels and ignoring door leaks or low-frequency issues. Thin foam absorbs high frequencies but does little for bass or sound escaping. This can lead to a false sense of security—your space might sound less echoey but still leak significant noise, defeating the purpose of a quiet environment.
Another common mistake is sealing the closet completely without considering ventilation. Over-sealing traps heat and humidity, which can damage equipment and cause muffled recordings. It also risks creating an unhealthy environment for long sessions. Instead, aim for a balanced approach: seal gaps effectively while maintaining airflow. Use bass traps to address low-frequency issues, and avoid over-insulating to prevent heat buildup. Small, strategic upgrades often outperform expensive, extensive treatments, especially when combined with proper placement and sealing.
For more, see this guide on common closet studio mistakes.
Frequently Asked Questions
Can a closet really be used as a vocal booth?
Yes, for reducing echo and improving vocal dryness, a closet works well. It’s a budget-friendly, space-efficient solution, though it’s rarely perfectly soundproof. Proper treatment and ventilation make a big difference.
What should I put on the walls first?
Start with the reflection points—behind the mic and the ceiling. These areas cause the most echo and harshness. Covering them with panels or blankets yields the biggest improvement in sound quality.
Do I need thick foam or just regular panels?
Thicker, denser panels are better for broad frequency absorption, especially low end. Thin foam helps with high-frequency reflections but isn’t enough on its own for a balanced sound.
Where should the microphone go in a closet booth?
Position the mic about 6-8 inches from your mouth, pointing slightly downward. Place it away from the walls and reflection points, and treat those areas with absorption to minimize echo.
How do I stop sound from leaking through the closet door?
Seal gaps with weatherstripping, hang a thick blanket or panel over the door, and reinforce seams with acoustic sealant. These simple steps cut noise leakage dramatically.
Conclusion
Your closet can be a surprisingly effective sound fortress—if you treat it right. Moving your rig into another room beats any foam panel, and sealing gaps makes the difference between echo and clarity.
Focus on placement, ventilation, and sealing, and your DIY setup will rival costly studios. After all, the smartest fix is often the simplest: put your noise where it belongs—away from your ears.